CHƯƠNG TRÌNH GIẢM 50% GIÁ TẤT CẢ CÁC GÓI HOSTING WORDPRESS => Link giảm 50%
1. Trường hay Field Datepicker là gì?
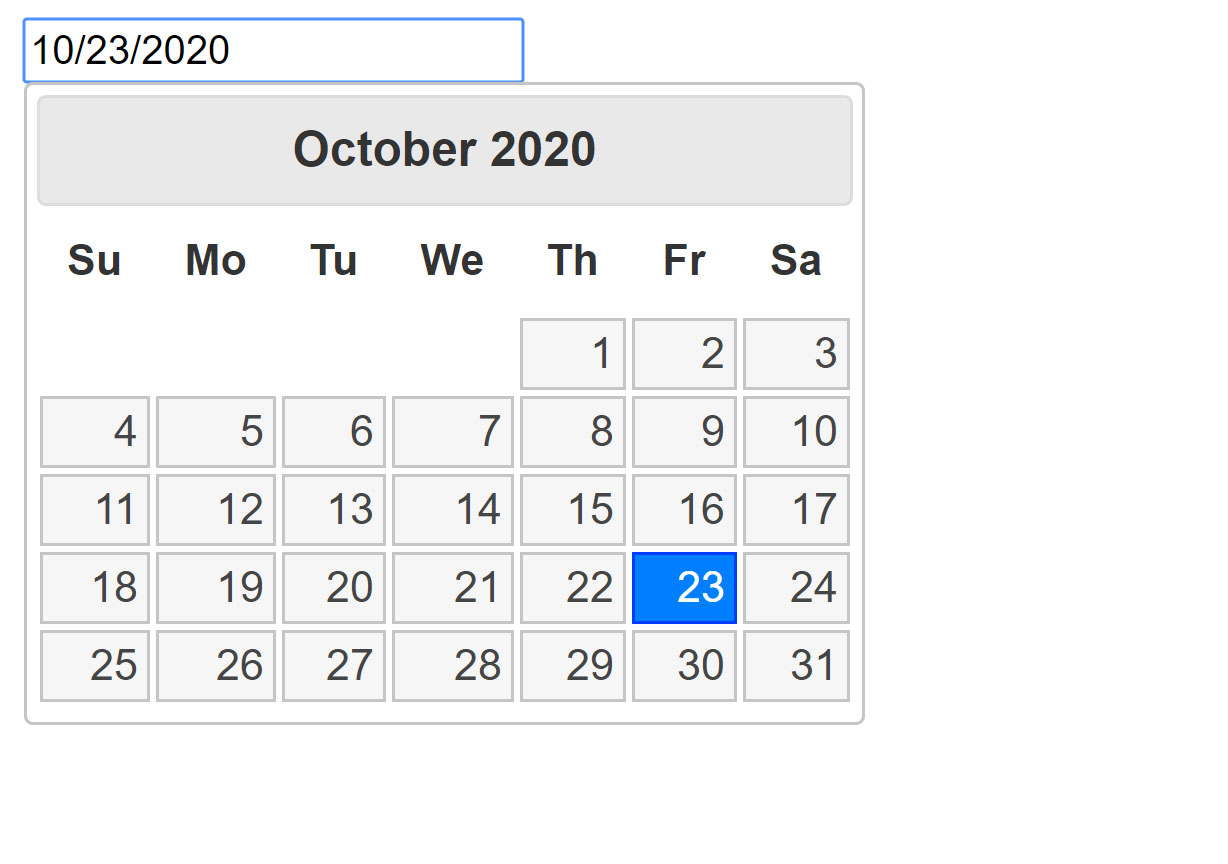
Là trường nhập liệu dạng textbox, thay vì cho khách hàng nhập bằng tay. Chúng ta sử dụng field Datepicker giúp tránh sai định dạng ngày tháng năm. Datepicker WordPress là jQuery UI được tích hợp sẵn, khi nào cần dùng chúng ta có thể gọi và sử dụng ngay.

2. Cách thêm field Datepicker vào trang Checkout WooCommerce
Trong ví dụ này tôi sẽ hướng dẫn các bạn thêm 1 field mới vào trang Thanh Toán của website bán hàng sử dụng WooCommerce.
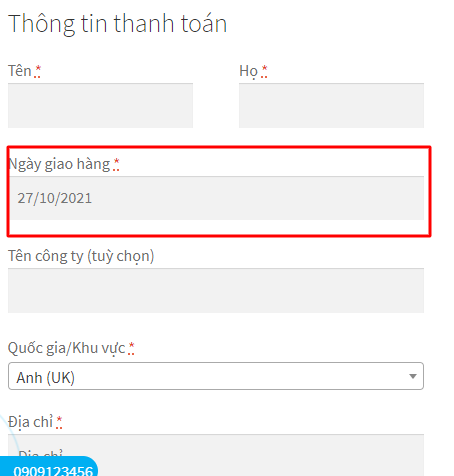
Mặc định khi khách hàng Checkout sẽ có một số field lấy thông tin như Họ tên, Quốc gia, Địa chỉ …. WooCommerce hỗ trợ chúng ta một số action giúp dễ dàng thêm hay bớt các trường này. Cụ thể trong bài viết này tôi sẽ chia sẻ cách thêm trường chọn ngày khách cần giao đơn hàng như sau:

Đoạn code sau chỉ có tác dụng khi Website bán hàng bạn đã cài plugin WordPress WooCommerce. Để làm được bạn cần copy các đoạn mã sau vào file functions.php trong theme nhé.
2.1 Gọi thư viện jQuery UI Datepicker trong WordPress
add_action( 'wp_enqueue_scripts', 'wpshare247_datepicker' );
function wpshare247_datepicker() {
    if( is_admin() || ! is_checkout() ) return;
    wp_enqueue_script( 'jquery-ui-datepicker' );
}
2.2 Thêm mới 1 field vào trang thanh toán WooCommerce
//2. Thêm 1 field vào trang thanh toán
add_filter( 'woocommerce_checkout_fields' , 'wpshare247_add_custom_checkout_field', 9999999 );
function wpshare247_add_custom_checkout_field( $fields ) {

    //New field---------
    $fields['billing']['wpshare247_my_date'] = array(
                                        'label'     => __('Ngày giao hàng', 'woocommerce'),
                                        'placeholder'   => date('d/m/Y'),
                                        'required'  => true, // Bắt buộc nhập hay không
                                        'class'     => array('form-row-wide wpshare247-datepicker'),
                                        'clear'     => true,
                                        'priority'  => 20	// Thứ tự field trong cùng 1 nhóm
      );

      // Tiếp tục thêm field khác giống như trên nếu muốn

    return $fields;
}
2.3 Gọi thư viện jQuery datepicker
add_action( 'wp_head', 'wpshare247_add_this_script_footer' );
function wpshare247_add_this_script_footer(){
?>
    <script>
        //Add new datepicker
        jQuery(document).ready(function(){
            jQuery('.wpshare247-datepicker input').datepicker({ dateFormat: 'dd/mm/yy' });
        });
    </script>
<?php
}
dateFormat là định dạng trả về của ngày tháng năm, bạn có thể thay đổi thành: dd-mm-yy hoặc yy-mm-dd tùy theo nhu cầu sử dụng. dd là ngày, mm là tháng, yy là năm.
2.4 Kiểm tra khi field dữ liệu là bắt buộc ( required = true )
add_action('woocommerce_checkout_process', 'wpshare247_checkout_field_process_save');
function wpshare247_checkout_field_process_save() {
    if ( ! $_POST['wpshare247_my_date'] )
        wc_add_notice( __( 'Please enter something into this new shiny field.' ), 'error' );
}
Nếu tại bước 2.2 bạn không khai báo required hoặc required => false thì có thể bỏ qua bước này.
2.5 Lưu dữ liệu cho field mới
add_action( 'woocommerce_checkout_update_order_meta', 'wpshare247_custom_checkout_field_update_order_meta' );
function wpshare247_custom_checkout_field_update_order_meta( $order_id ) {
    if ( ! empty( $_POST['wpshare247_my_date'] ) ) {
        update_post_meta( $order_id, 'wpshare247_my_date', sanitize_text_field( $_POST['wpshare247_my_date'] ) );
    }
}
Như vậy bằng cách thêm 5 đoạn code trên bạn đã thêm được 1 field mới vào trang thanh toán rồi. Vậy bạn có nghĩ rằng nếu tôi muốn xóa các field không cần thiết mặc định của WooCommerce thì làm như thế nào không?
Để xóa hay remove field mặc định bạn xem đoạn code tại bước dưới đây nhé.
3. Xóa field khỏi trang Checkout WooCommerce
WooCommerce cũng hộ trợ chúng ta loại bỏ các trường không cần thiết thông qua filter woocommerce_checkout_fields kết hợp thêm hàm unset trong php chúng ta có thể làm điều đó dễ dàng như sau:
add_filter( 'woocommerce_checkout_fields' , 'wpshare247_wc_checkout_fields', 9999999 );
function wpshare247_wc_checkout_fields( $fields ) {

    //Xóa các field không cần dùng, đây chỉ là ví dụ, bạn hãy tìm đúng ID của field trước khi xóa nhé
    // Billing fields
    unset( $fields['billing']['billing_company'] );
    unset( $fields['billing']['billing_email'] );
    unset( $fields['billing']['billing_phone'] );
    unset( $fields['billing']['billing_state'] );
    unset( $fields['billing']['billing_first_name'] );
    unset( $fields['billing']['billing_last_name'] );
    unset( $fields['billing']['billing_address_1'] );
    unset( $fields['billing']['billing_address_2'] );
    unset( $fields['billing']['billing_city'] );
    unset( $fields['billing']['billing_postcode'] );

    // Shipping fields
    unset( $fields['shipping']['shipping_company'] );
    unset( $fields['shipping']['shipping_phone'] );
    unset( $fields['shipping']['shipping_state'] );
    unset( $fields['shipping']['shipping_first_name'] );
    unset( $fields['shipping']['shipping_last_name'] );
    unset( $fields['shipping']['shipping_address_1'] );
    unset( $fields['shipping']['shipping_address_2'] );
    unset( $fields['shipping']['shipping_city'] );
    unset( $fields['shipping']['shipping_postcode'] );

    // Order fields
    unset( $fields['order']['order_comments'] );

    return $fields;
}
Tham khảo thêm ID của các nhóm Field bên dưới:
Billing Fields (Thông tin thanh toán)
- billing_first_name
- billing_last_name
- billing_company
- billing_country
- billing_address_1
- billing_address_2
- billing_city
- billing_state
- billing_postcode
- billing_phone
- billing_email
Shipping Fields (Thông tin giao hàng)
- shipping_first_name
- shipping_last_name
- shipping_company
- shipping_country
- shipping_address_1
- shipping_address_2
- shipping_city
- shipping_state
- shipping_postcode
Order Fields (Thông tin mở rộng)
- order_comments
Account Fields (Thông tin tài khoản)
- account_username
- account_password
4. Sửa tiêu đề Field (Label)
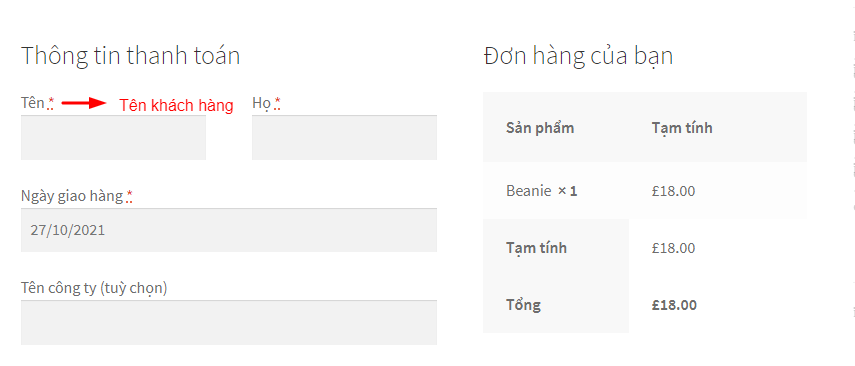
Trường hợp bạn cần thay đổi tiêu đề các trường như ví dụ bên dưới thì làm như thế nào? Cụ thể Tên sẽ đổi bằng Tên khách hàng

Bạn có thể làm bằng đoạn code sau:
add_filter( 'woocommerce_checkout_fields' , 'wpshare247_wc_checkout_field_change_label', 9999999 );
function wpshare247_wc_checkout_field_change_label( $fields ) {
    //Tìm và thay đổi giá trị của label như bên dưới
    $fields['billing']['billing_first_name']['label'] = 'Tên khách hàng';

    return $fields;
}
5. Sắp xếp thứ tự các field
Bạn hoàn toàn có thể điều khiển thứ tự các trường lại theo ý muốn của mình. Trước khi làm điều đó tôi muốn cho các bạn biết thứ tự mặc định hay còn gọi là Priority mà WooCommerce qui định.
- First name – 10
- Last name – 20
- Company name – 30
- Country – 40
- Street address – 50
- Apartment, suite, unit etc. (optional) – 60
- Town / City – 70
- State – 80
- Postcode / ZIP – 90
- Phone – 100
- Email – 110
Bạn hãy cố gắng thay đổi các các con số Priority của các field cho đến khi bạn vừa ý bằng code sau:
add_filter( 'woocommerce_checkout_fields' , 'wpshare247_sort_checkout_fields', 9999999 );
function wpshare247_sort_checkout_fields( $fields ) {
    $fields['billing']['billing_email']['priority'] = 22;
    $fields['billing']['billing_phone']['priority'] = 23;
    return $fields;
}
6. Bỏ hoặc thêm bắt buộc nhập cho các field
Đôi khi chúng ta cần bỏ và thêm bắt buộc nhập liệu trường chúng ta cần làm như sau:
add_filter( 'woocommerce_checkout_fields' , 'wpshare247_required_checkout_fields', 9999999 );
function wpshare247_required_checkout_fields( $fields ) {
    $fields['billing_phone']['required'] = false; // true nếu muốn bắt buộc nhập
    //Làm tương tự cho các trường khác--------------
    return $fields;
}
Như vậy tôi vừa giới thiệu sơ lược cách thêm xóa sửa các field trong trang checkout của Website thương mại điện tử bán hàng dùng WooCommerce. Hi vọng bài viết sẽ giúp ích được cho các bạn mới học WordPress.
CHƯƠNG TRÌNH GIẢM 50% GIÁ TẤT CẢ CÁC GÓI HOSTING WORDPRESS => Link giảm 50%

